Installing Flagstone Pathway: 10 Proven Tips for Stunning Results 2025
Transform Your Landscape with Flagstone Pathways
Quick Guide to Installing Flagstone Pathway
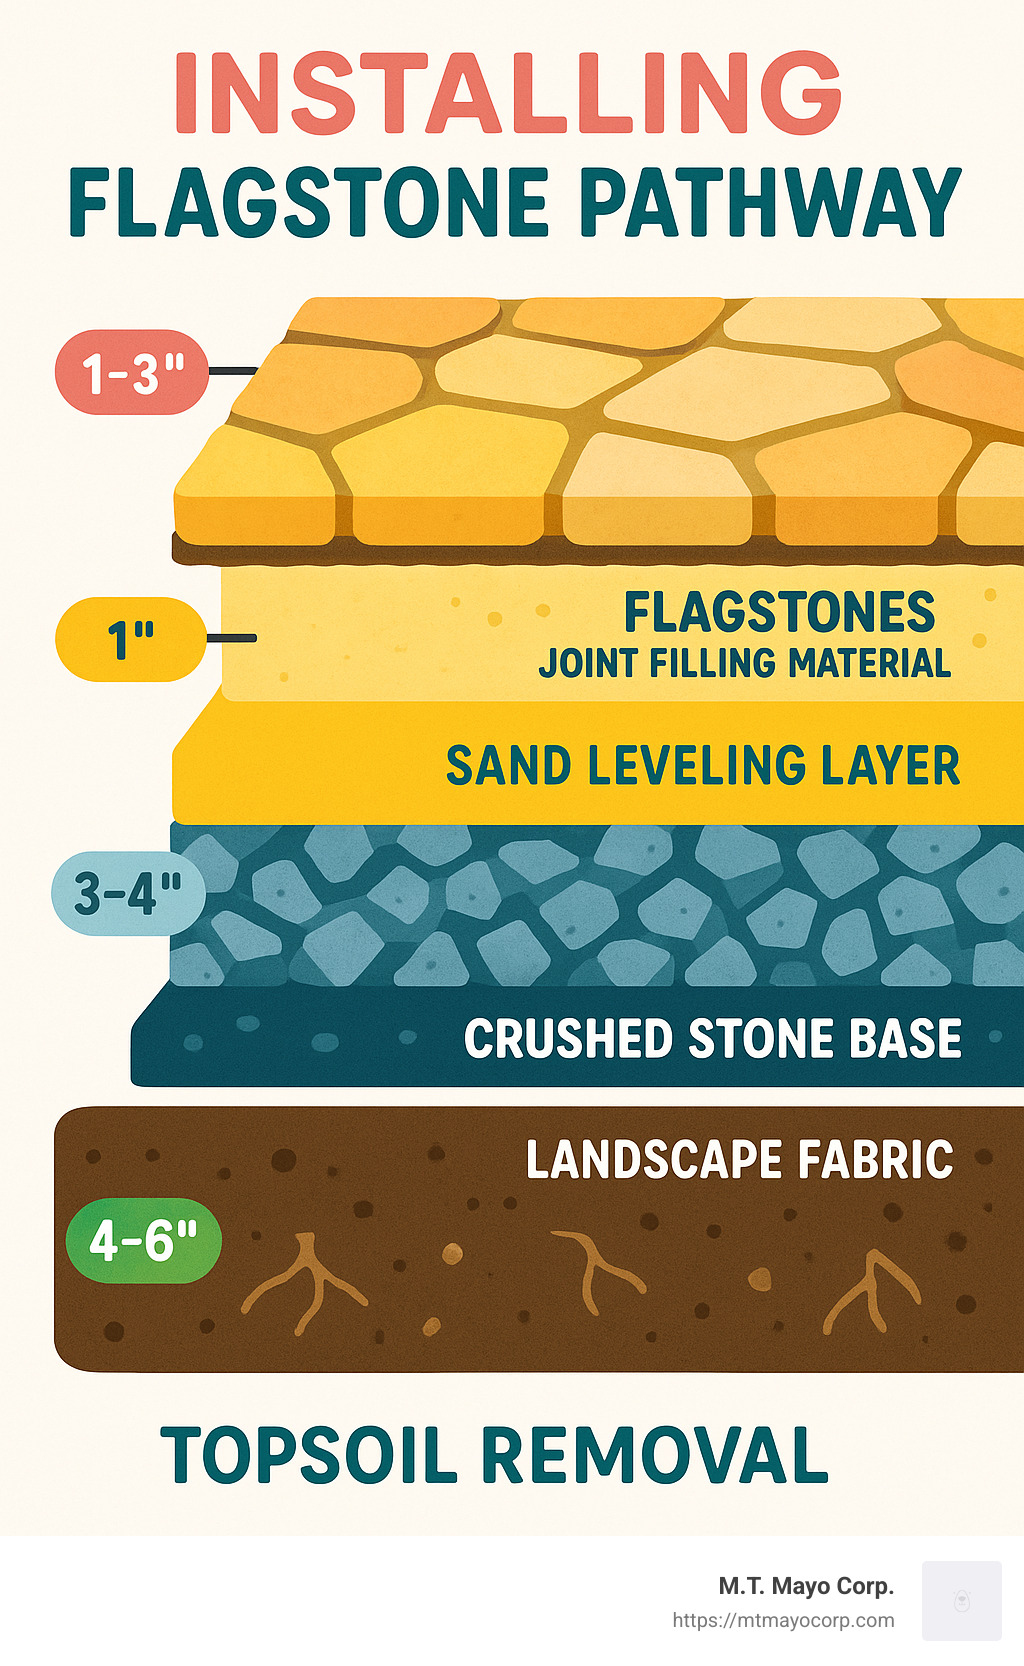
Installing flagstone pathway involves these essential steps:
- Plan and mark your pathway design (3 feet wide is standard)
- Excavate 6-8 inches of soil along the marked area
- Add landscape fabric to prevent weed growth
- Install edging to contain materials
- Add and compact 3-4 inches of crushed stone base
- Spread 1-2 inches of sand or decomposed granite
- Arrange flagstones with 1-3 inch gaps between them
- Level each stone using a rubber mallet
- Fill gaps with polymeric sand, gravel or ground cover plants
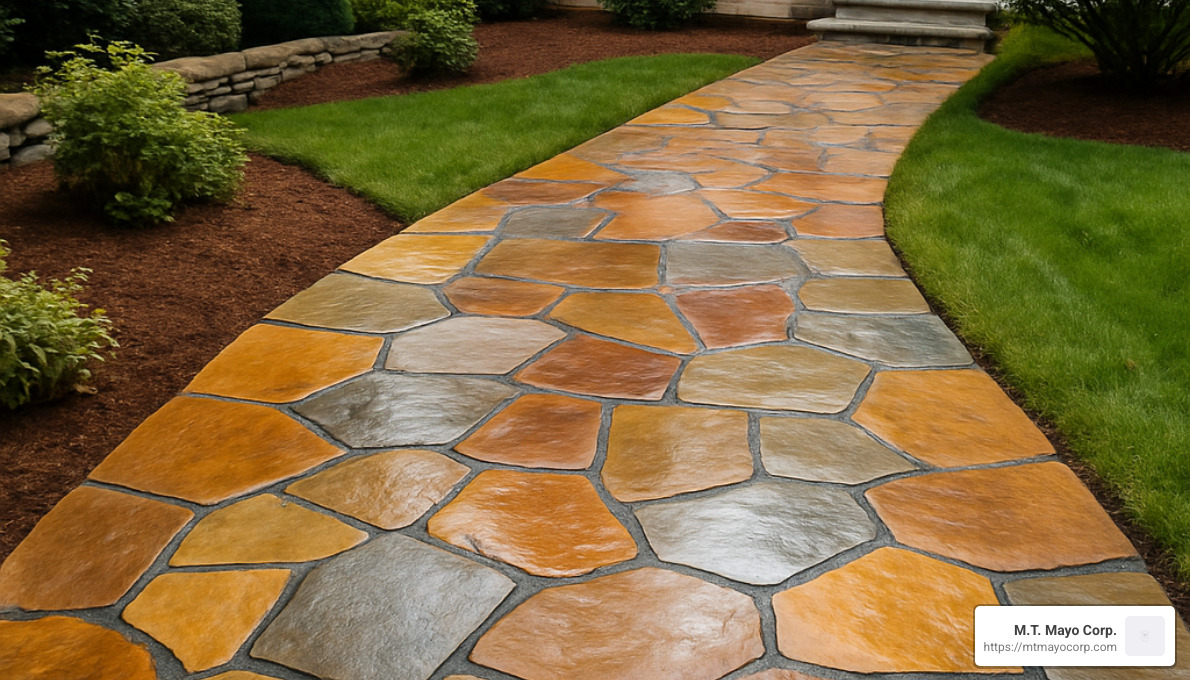
There’s something magical about a winding flagstone path that invites you to explore a garden or leads you home. More than just a practical walking surface, a well-designed flagstone pathway transforms your outdoor space with natural beauty and rustic charm that manufactured materials simply can’t match.
What makes flagstone truly special is its character. Each stone tells its own story through unique colors, textures, and shapes that blend harmoniously with your landscape. Unlike the uniformity of concrete or factory-made pavers, flagstone creates a one-of-a-kind path that feels as though it’s always been part of your property. And the best part? When properly installed, these pathways can last for decades with minimal upkeep.
The process of installing flagstone pathway systems is surprisingly approachable for weekend warriors willing to roll up their sleeves. Yes, it requires some planning and honest physical effort, but the results are worth every bead of sweat. Most homeowners can complete a medium-sized pathway in about 2-5 days, depending on your experience and how ambitious your design is.
As the trusted experts at This Old House recommend through their landscaping specialist Roger Cook, “A three-foot width creates a comfortable single-person path.” This dimension has become the gold standard for residential walkways, providing just the right amount of space without overwhelming your landscape. For durability, stick with flagstones between 1.5 and 2 inches thick – anything thinner might crack under regular foot traffic.
Before grabbing your shovel, take a moment for some important preliminary steps. Check with your local building department about permits – some areas require them for hardscape installations. And please, always call utility companies before digging to avoid an unexpected (and potentially dangerous) encounter with underground lines.
Flagstone Pathway Basics: Benefits & Stone Selection
There’s something magical about a flagstone pathway winding through a garden. These natural stone walkways have charmed homeowners for centuries, and with good reason. At M.T. Mayo Corp., we’ve laid countless flagstone paths throughout Middlesex and Essex Counties, watching ordinary yards transform into enchanting outdoor spaces that look like they belong in a storybook.
Flagstone isn’t just pretty—it’s practical too. These flat slabs of sedimentary rock provide natural traction even when rain-slicked or dusted with morning frost. This non-slip quality makes flagstone especially valuable here in New England, where our weather can throw everything from summer downpours to winter ice at your walkways.
When it comes to longevity, flagstone is the tortoise that wins the race. A well-installed flagstone path can last 50+ years with minimal care. It won’t rot like wood, rarely cracks like concrete, and unlike manufactured pavers, it holds its distinctive character as decades pass. Many of our clients joke that their flagstone paths will likely outlast them—and they’re probably right!
| Material | Cost per sq ft | Lifespan | Maintenance | Environmental Impact |
|---|---|---|---|---|
| Flagstone | $15-27 | 50+ years | Low | Low (natural material) |
| Concrete | $5-10 | 20-30 years | Medium | High (carbon footprint) |
| Pavers | $10-20 | 25-40 years | Medium | Medium |
| Gravel | $1-3 | 5-10 years | High | Low |
| Wood | $5-15 | 7-15 years | High | Medium (treated wood) |
When selecting your perfect flagstone, you’ll encounter several beautiful varieties, each with its own personality:
Sandstone brings warm, earthy tones ranging from soft buff to rich rust. It’s relatively soft, making it easier to cut and shape, yet still plenty durable for everyday foot traffic.
Slate offers dramatic color with its deep blues, grays, and purples. The distinctive layered appearance creates visual interest, while its hardness and moisture resistance make it perfect for our New England climate.
Limestone provides a more formal look with its creamy whites and tans. It’s the understated elegance option that complements both traditional and contemporary landscapes.
Quartzite is the heavyweight champion of durability. Extremely hard and long-lasting, it rewards you with vibrant colors including gold, copper, and striking blue-gray tones.
The golden rule for pathway flagstone is the thickness test: stick with stones 1.5-2 inches thick. Thinner stones might crack under foot traffic, while thicker ones cost more without adding benefits. And here’s a pro tip we’ve learned from years of experience: always order about 10% more stone than your calculations suggest. This accounts for inevitable cutting waste, breakage, and those oddly-shaped pieces that just won’t fit your puzzle.
Choosing the Best Flagstone Type
Selecting the right flagstone isn’t just about color—it’s about finding stone that works with your specific location and needs. After installing countless pathways throughout Middlesex and Essex Counties, we’ve developed a keen sense for matching stone to site.
Regional availability matters more than you might think. Here in Massachusetts, we’re lucky to have access to beautiful New England bluestone—a type of sandstone with gorgeous blue-gray coloration. Using locally sourced stone not only keeps costs reasonable but also ensures your pathway looks at home in our New England landscape.
Texture deserves careful consideration for any walkway. You want enough grip to prevent slips but not so much roughness that it’s uncomfortable. As one Winchester homeowner told us after her pathway installation, “I love how it feels natural underfoot but isn’t slippery when it rains.” We couldn’t have said it better ourselves.
Our famous New England winters demand stones with excellent freeze-thaw resistance. We’ve seen poorly chosen flagstone start flaking and splitting after just a few winters, while properly selected varieties like certain slates and quartzites shrug off decades of freezing and thawing without complaint.
More clients are asking about sustainable sourcing these days, and we’re glad to see it. We prioritize stone from quarries using responsible practices, preferably from local or regional sources to reduce transportation impacts. This approach not only benefits the environment but often results in pathways that look like they truly belong in your landscape rather than being imported from another world.
Benefits Over Other Walkway Materials
Flagstone brings several unique advantages that make it worth considering over other materials for your pathway project:
The permeability of flagstone pathways is a hidden superpower. When installed with sand or gravel joints, these pathways allow rainwater to seep through to the soil below instead of running off into storm drains. This natural drainage helps recharge groundwater and reduces flooding issues. It’s becoming increasingly valuable as more towns in Middlesex and Essex Counties implement regulations limiting impervious surfaces on properties.
Easy repairs are another practical benefit that homeowners appreciate years down the road. If a single stone becomes damaged or settles unevenly, we can simply lift it, fix the base, and reset it—or replace just that stone if necessary. Try doing that with a cracked concrete walkway! This sectional nature makes flagstone pathways much more forgiving and less costly to maintain over their long lifetime.
The organic shapes of flagstone create a natural flow that manufactured materials simply can’t match. Last summer, we completed a winding path in Lexington that curves gently through a perennial garden. The irregular edges of the stones created perfect pockets for creeping thyme and moss to spill over, softening the edges. As the homeowner told us, “It looks like it’s always been there, like the garden grew around the path rather than the other way around.”
Finally, a well-designed flagstone pathway offers a significant resale value boost. Real estate professionals we work with consistently tell us that quality stone hardscaping can return 80-100% of its investment when selling a home. More importantly, it creates immediate curb appeal that helps properties sell faster—the kind of first impression that makes potential buyers fall in love before they even reach the front door.
Planning, Design & Essential Gear
Proper planning is the foundation of a successful flagstone pathway installation. At M.T. Mayo Corp., we’ve found that the most beautiful and functional pathways begin with careful consideration of design, materials, and site conditions.
Start by determining the purpose of your pathway. Will it be a main walkway that needs to accommodate two people side by side? Or is it a garden path where single-file traffic is sufficient? For primary walkways, we recommend a minimum width of 3 feet, which provides comfortable passage for most people. Garden paths can be narrower, typically 18-24 inches, but narrower paths feel more intimate and may not be suitable for everyone.
When deciding between straight or curved layouts, consider both function and aesthetics. Straight paths offer the most direct route and often complement formal landscape designs. Curved paths create a more relaxed, inviting journey and can gracefully steer around existing landscape features. Just be sure to avoid sharp turns that feel awkward to walk – your feet naturally want to follow gentle curves!
For proper drainage (and to avoid puddles on your beautiful new path), incorporate a slight slope of approximately 1/8 inch per foot. This subtle grade is barely noticeable to the eye but ensures water runs off rather than pooling between stones. The slope should direct water away from your home’s foundation toward appropriate drainage areas – your basement will thank you!
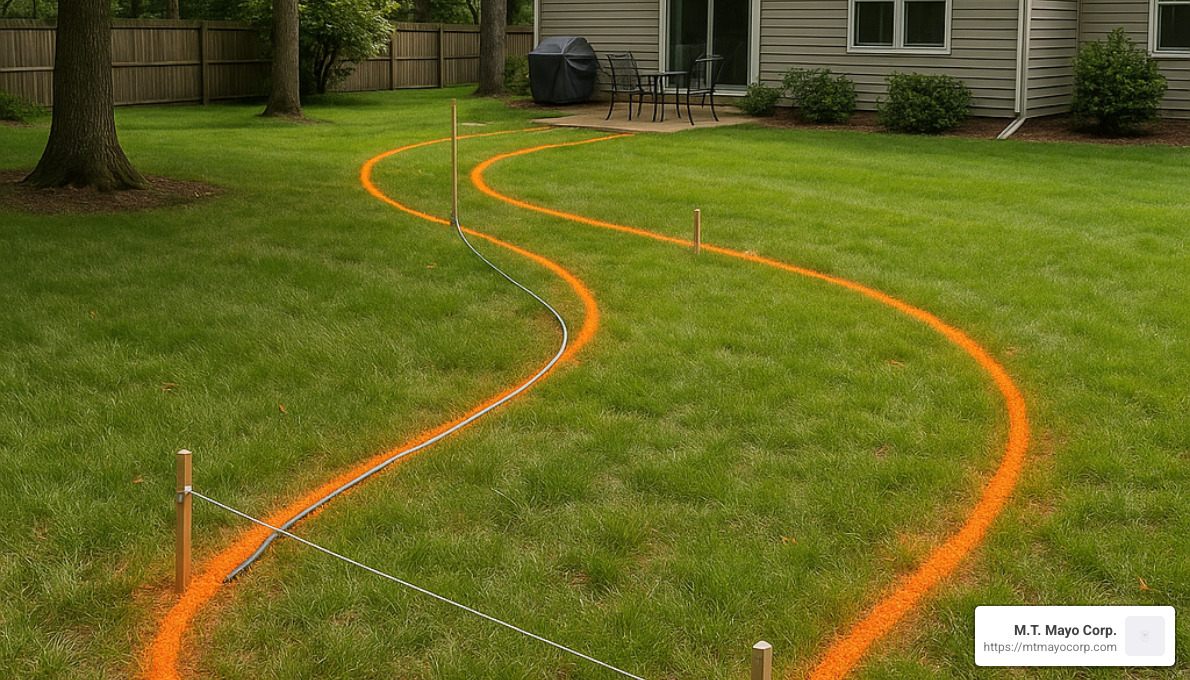
Marking your pathway is easier than you might think. For straight sections, simple stakes and string work perfectly. For those lovely curves, a garden hose provides a flexible guide that you can adjust until it looks just right. Once you’re satisfied with the layout, grab some landscape marking spray paint to create a clear outline for excavation.
Speaking of digging, you’ll need to excavate to a depth of 6-8 inches, depending on your climate and soil conditions. Here in Massachusetts, where freeze-thaw cycles are as reliable as Patriots fans, we typically recommend the full 8 inches to provide adequate base layers that resist frost heave.
Edging is your pathway’s unsung hero, quietly holding everything in place year after year. Options include:
- Steel edging: Durable and nearly invisible once installed
- Vinyl edging: Affordable and easy to install
- Benderboard: Flexible wood composite that works beautifully for curves
For the base material, crushed stone (often called “process gravel” or “¾-inch minus”) provides excellent stability and drainage. You’ll need enough to create a 3-4 inch layer after compaction. The leveling layer can be either coarse sand or decomposed granite (DG). We often prefer DG for pathways in New England because it locks together better than sand and provides additional stability through our wild temperature swings.
When installing flagstone pathway projects, you’ll need some essential tools:
A flat shovel and spade will be your best friends during excavation. You’ll also need a wheelbarrow (and possibly a strong friend) to move materials. A tamper or plate compactor is essential for creating a solid base – don’t skip this step! For cutting stones to fit, an angle grinder with a diamond blade works wonders, while a rubber mallet helps set stones firmly in place. A 4-foot level, stone chisel for shaping stones, garden rake, broom, tape measure, and line level round out your toolkit.
Safety should never be an afterthought! Always protect yourself with safety goggles (especially when cutting stone), sturdy gloves, steel-toed boots if possible, a dust mask when cutting stone, and hearing protection when using power equipment. Your future self will appreciate the precautions.
With thoughtful planning and the right tools at hand, you’ll be well-prepared for the satisfying work of installing flagstone pathway systems that will improve your property for decades to come. As one of our Lexington clients recently told us, “Planning took me longer than I expected, but it saved me so much time and frustration during installation!”
Installing Flagstone Pathway: Step-by-Step Guide
Now that you’ve planned your pathway and gathered your materials and tools, it’s time to get your hands dirty. The process of installing flagstone pathway systems is physically demanding but straightforward when approached methodically. At M.T. Mayo Corp., we’ve refined our installation process through hundreds of projects across Middlesex and Essex Counties, and we’re sharing our expertise to help you achieve professional-quality results.
The key to a successful flagstone pathway lies in creating a stable foundation with proper drainage. Think of your pathway as a sandwich with multiple layers, each serving a specific purpose. The time you invest in preparing these layers will determine how long your pathway lasts and how good it looks years from now.
Site Preparation for Installing Flagstone Pathway
Before you dig the first shovelful of dirt, call the utility notification service at 811. This free service marks underground utilities so you can dig safely. In Massachusetts, you’re legally required to call at least 72 hours before digging. We’ve seen too many DIY projects turn into expensive disasters because someone skipped this simple step.
Once you’ve confirmed it’s safe to dig, begin by removing sod and any plants along your marked pathway. For narrow paths, a flat shovel works well for cutting and removing sod. For larger areas, consider renting a sod cutter to make the job easier.
Next, excavate to a depth of 6-8 inches along the entire pathway. Remove all roots, rocks, and debris that could affect the stability of your path. If you encounter large tree roots, you may need to adjust your path or carefully work around them—never cut structural roots of healthy trees.
“The most common mistake I see is not digging deep enough,” says one of our foremen with 20 years of experience. “People try to save time by skimping on excavation, but then they end up with unstable stones and drainage problems.”
After excavation, compact the soil using a hand tamper or rented plate compactor. This creates a solid foundation for the layers that follow. In areas with clay soil (common in parts of Middlesex County), you might need to add a thin layer of coarse sand before compaction to improve drainage.
Now it’s time to install landscape fabric. This crucial layer prevents weeds from growing up through your pathway while still allowing water to drain through. We recommend using a commercial-grade, max weed control landscape fabric rather than the thinner residential types that deteriorate quickly.
Lay the fabric across the entire excavated area, extending it several inches up the sides. Where pieces meet, overlap them by at least 4-5 inches to prevent gaps where weeds could penetrate. Secure the fabric with landscape staples, particularly along the edges and at overlaps.
Building the Base Layers
The base layers provide stability, drainage, and frost protection for your flagstone pathway. This is where many DIY installations fall short, but at M.T. Mayo Corp., we know that a proper base is essential for a pathway that remains beautiful and functional for decades.
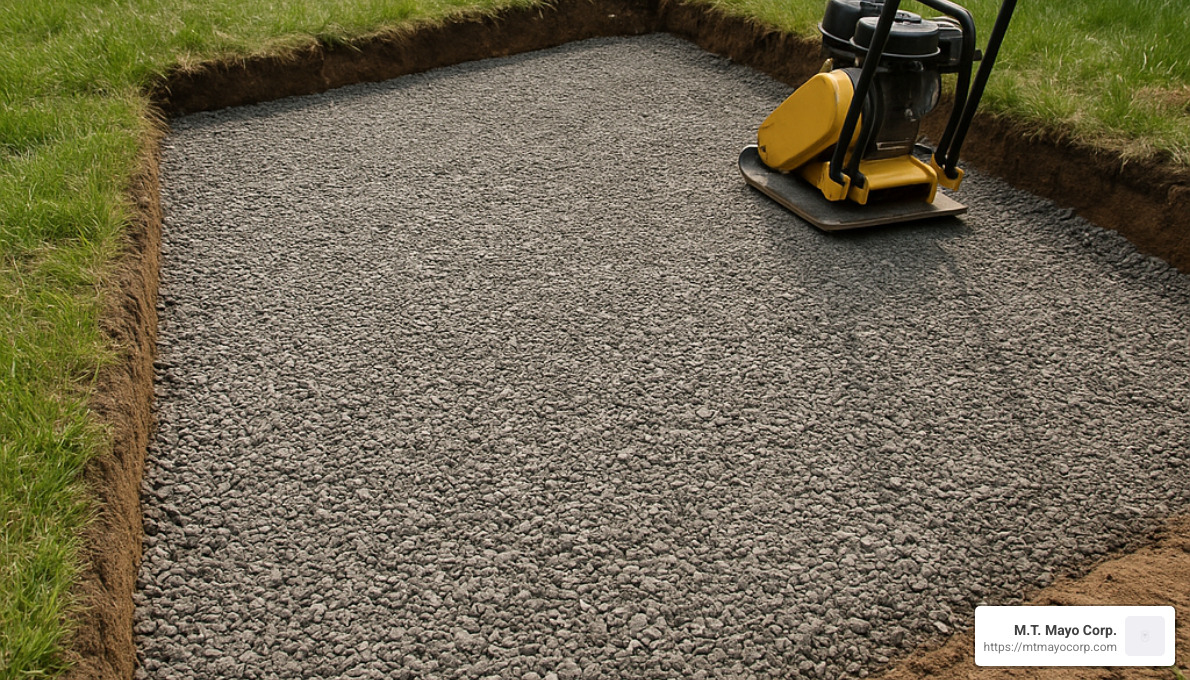
Start by adding 3-4 inches of crushed stone (¾-inch minus) to the excavated area. For best results, add this material in 2-inch “lifts” or layers, compacting each layer before adding the next. Water the stone lightly before compaction to help it settle and lock together. A plate compactor provides the best results, but a hand tamper can work for smaller pathways.
“You can’t over-compact the base,” is a saying we use on our crews. The more thoroughly you compact this layer, the less settling you’ll experience later. You’ll know you’ve compacted enough when you can walk across the stone without leaving footprints.
Next comes the leveling layer—1-2 inches of either coarse sand or decomposed granite (DG). We often prefer DG for pathways in Massachusetts because it provides better stability in our freeze-thaw climate and helps lock the flagstones in place.
Spread this material evenly across the compacted base. To ensure a consistent thickness, use screed boards—straight pieces of 2×4 set at the desired height of your leveling layer. Pull a straight board across these guides to create a perfectly level surface.
An important technique that many DIYers miss is “crowning” the center of the pathway. By making the middle slightly higher (about ¼ inch per foot of width), you create natural drainage toward the edges. This prevents water from pooling on your pathway during rain or snow melt.
In New England, frost heave is a significant concern. When moisture in the soil freezes, it expands and can push up stones, creating an uneven and potentially hazardous surface. Our properly constructed base layers, with excellent drainage and adequate depth, minimize this risk. For particularly problematic areas, we sometimes incorporate a layer of rigid foam insulation beneath the crushed stone to further protect against frost heave.
Laying & Fitting Stones for Installing Flagstone Pathway
This is where your pathway begins to take shape and your design choices become visible. Laying flagstone is part science, part art, and we find it’s often the most satisfying part of the process.
Begin by placing your largest flagstones first, starting at the edges or any fixed points like steps or existing patios. These anchor stones establish the pattern and height for the rest of the pathway. For a natural look, vary the sizes and shapes of stones rather than creating a too-perfect pattern.
The “puzzle method” works well for flagstone installation: lay out several stones at once, step back to assess the arrangement, then adjust as needed before setting them permanently. Aim for joints between stones of 1-3 inches—consistent enough to look intentional but varied enough to appear natural.
Always place flagstones with their flattest side up to create a smooth walking surface. If a stone rocks or wobbles, don’t force it. Instead, either add or remove material from the leveling layer beneath it, or flip the stone to find a more stable orientation.
For stones that need cutting or shaping, an angle grinder with a diamond blade works best for precise cuts. For rougher breaks, score the stone with a chisel along your desired break line, then strike firmly with a hammer. Always wear safety goggles and a dust mask when cutting stone.
Once you’re satisfied with a stone’s position, set it firmly in place by tapping gently with a rubber mallet. This embeds the stone into the leveling layer and ensures good contact across the bottom surface.
A tip from our experienced installers: Keep some extra decomposed granite or sand nearby in a bucket. This allows you to make quick adjustments under stones that sit too low without disrupting your progress.
Flagstones should be set slightly above the final grade of your lawn or garden—about ½ inch is ideal. This prevents soil and mulch from washing onto the pathway during rain and creates a clean, defined edge.
Filling Joints & Adding Edging
The material you choose for filling the joints between flagstones affects both the appearance and functionality of your pathway. At M.T. Mayo Corp., we offer several options to our clients based on their specific needs and aesthetic preferences.
Polymeric sand is a popular choice for joint filling. This special sand contains polymers that harden when exposed to water, creating a firm, weed-resistant joint that still allows some water penetration. The polymeric sand is swept into the joints, compacted, and then lightly misted with water to activate the binding agents. It’s particularly effective for pathways with wider joints and in areas where you want minimal maintenance.
Pea gravel creates a more casual, rustic look and provides excellent drainage. The small, rounded stones contrast nicely with the flat flagstones and can be easily replenished if they wash away or become displaced. However, pea gravel may require occasional replenishment and doesn’t prevent weeds as effectively as other options.
For a truly unique pathway, consider creeping thyme or other low-growing ground cover plants between your flagstones. This “living grout” adds color, texture, and fragrance to your pathway. In a recent project in Concord, we installed a flagstone path with creeping thyme joints that the homeowner described as “magical when it blooms—like walking through a carpet of purple flowers.” Plant-filled joints require more maintenance than other options but create a stunning effect that integrates hardscaping with the surrounding landscape.
| Joint Material | Pros | Cons | Maintenance Level |
|---|---|---|---|
| Polymeric Sand | Stable, weed-resistant, retains color | Can crack in extreme conditions, less permeable | Low |
| Pea Gravel | Excellent drainage, easy to replenish, natural look | Can scatter, may wash out in heavy rain | Medium |
| Decomposed Granite | Locks stones in place, natural appearance, affordable | May wash out, needs occasional replenishment | Medium |
| Creeping Thyme | Beautiful, fragrant, integrates with landscape | Requires watering and care, slower to establish | High |
Regardless of your joint filling choice, proper edging is essential to keep your pathway intact and prevent materials from migrating. We typically install edging before laying stones, but it’s worth revisiting at this stage to ensure it’s secure and at the proper height.
For most residential pathways, we recommend This edging, which provides excellent durability while remaining nearly invisible once installed. Steel edging should be set with the top edge just below the surface of your flagstones to prevent tripping hazards while still containing your base materials.
If you’ve opted for a more natural edge, large perimeter stones can serve as their own edging. In this case, ensure these stones are particularly well-seated in your base material and consider backfilling along the outside edge with soil to prevent undermining.
Level & Safety Checklist
Before considering your flagstone pathway complete, perform a thorough level and safety check. This crucial final inspection ensures your pathway is not only beautiful but safe and functional for years to come.
Start by checking each stone with a 4-foot level. While slight variations are normal and even desirable for drainage, no stone should tilt excessively or create a tripping hazard. For longer pathways, use a line level stretched between endpoints to verify the overall grade maintains your planned drainage slope of approximately 1/8 inch per foot.
Next, conduct a “walk test.” Travel the entire pathway, noting any stones that move or rock under your weight. These unstable stones need additional adjustment—either add or remove material underneath or reset the stone entirely. Pay particular attention to transitions where your pathway meets other surfaces like steps, patios, or driveways.
Check for potential trip hazards, especially at the edges of your pathway. The transition between the flagstone and surrounding landscape should be smooth and obvious. If necessary, add soil around the perimeter to create a gentle transition rather than an abrupt edge.
A water runoff test can reveal drainage issues before they become problems. Using a garden hose, gently spray water on your pathway and observe how it flows. Water should move toward the edges rather than pooling on or between stones. If you notice pooling, you may need to adjust the grade or improve drainage in that area.
Finally, use your rubber mallet to make any minor adjustments to stones that have shifted during the joint-filling process. A few gentle taps can often resolve small issues without requiring complete reinstallation.
As one of our project managers likes to say, “The difference between a good pathway and a great pathway often comes down to the final hour of tweaking and adjusting.” Take the time to get these details right, and your pathway will provide safe, beautiful access through your landscape for decades.
Common Mistakes to Avoid
Through our years of experience installing flagstone pathway systems throughout Middlesex and Essex Counties, we’ve seen numerous DIY projects that required professional intervention to fix preventable problems. Here are the most common mistakes to avoid:
Skipping proper compaction is perhaps the most frequent error. Inadequate compaction of the base layers leads to settling, which creates uneven surfaces and unstable stones. Always compact thoroughly, using the appropriate equipment for your project size.
Choosing stones that are too thin is another common mistake. Flagstones less than 1.5 inches thick may look fine initially but are prone to cracking under normal foot traffic. The money saved on thinner stone is quickly lost when replacements become necessary.
Creating a flat grade without drainage leads to water pooling on or between stones. This not only creates slipping hazards but can lead to accelerated deterioration, especially in freeze-thaw climates like Massachusetts. Always incorporate a slight slope and consider how water will flow off your pathway.
Using the wrong joint filler for your specific conditions can cause ongoing maintenance issues. For example, using standard sand in areas with heavy rainfall often results in washed-out joints that require frequent refilling. Match your joint material to your climate and desired maintenance level.
Skipping the utility check before digging is not just a mistake—it can be dangerous and expensive. Always call 811 before you dig, even for seemingly shallow projects. Damaging underground utilities can result in service disruptions, repair costs, and potentially hazardous conditions.
Insufficient base depth is particularly problematic in New England, where frost heave can quickly destroy an inadequately prepared pathway. The 6-8 inch excavation depth we recommend isn’t arbitrary—it’s based on decades of experience with our local climate conditions.
By avoiding these common pitfalls, you’ll save time, money, and frustration while creating a flagstone pathway that improves your property for years to come.
Upkeep, Cost & Compliance
A well-installed flagstone pathway rewards you with decades of beauty while asking very little in return. As we often tell our clients at M.T. Mayo Corp., the beauty of natural stone is that it just gets better with age – if you give it a little TLC along the way.
Keeping your pathway looking its best is surprisingly simple. A quick sweep every few weeks prevents leaves and debris from accumulating and staining the stone. For deeper cleaning, nothing beats a gentle pressure washing once a year to reveal those gorgeous natural colors and textures that might have dulled under a year of New England weather.
Every 2-3 years, consider applying a quality stone sealer – it’s like sunscreen for your pathway. This is especially important for more porous stones like sandstone that tend to drink up moisture. A good sealer improves those natural colors while creating a protective barrier against the elements. Just apply in thin, even coats and follow the manufacturer’s instructions for best results.
When it comes to weeds, an ounce of prevention truly is worth a pound of cure. If you spot a determined dandelion trying to set up home between your stones, evict it immediately. For an eco-friendly approach that won’t harm your plants or local watershed, try a simple homemade solution of white vinegar, salt, and a dash of dish soap – nature’s weed killer that won’t break the bank or the environment.
Winter in Massachusetts brings its own challenges. Swap out that metal snow shovel (which can chip your beautiful stones) for a plastic one or a snowblower set to the right height. And when it comes to ice, choose de-icers wisely – calcium magnesium acetate (CMA) is gentle on stone surfaces, while traditional rock salt can cause damage over time. As one of our Winchester clients wisely noted, “It’s better to spend a few more dollars on the right de-icer than to replace damaged stones later.”
For homeowners who need more extensive hardscaping beyond a DIY pathway, check out our More info about Hardscaping Services throughout Middlesex and Essex Counties.
Quick Maintenance Schedule
Keeping your flagstone pathway in tip-top condition throughout our challenging New England seasons is easier with a simple schedule. Think of it as seasonal care for your outdoor investment.
In spring, take a good look at your pathway after winter’s freeze-thaw cycles have done their work. Reset any stones that winter frost may have nudged out of place by adding or removing base material underneath. This is also the perfect time for a thorough cleaning and to replenish any joint material that might have washed away with the melting snow.
Summer maintenance is minimal – just keep an eye out for weeds that love to sneak in during the growing season and give your pathway an occasional rinse to wash away pollen and dust.
Fall cleaning is all about preventing those colorful leaves from decomposing on your stones and leaving stains. A quick sweep or leaf blower pass keeps things tidy. It’s also smart to check your drainage before winter arrives – ensuring water won’t pool and freeze on your pathway.
Every couple of years, apply a fresh coat of sealer to maintain that protection. If you notice any stubborn stains or discoloration that regular cleaning won’t touch, it might be time for a professional cleaning service.
“The best maintenance is consistent maintenance,” as our crew foreman likes to say. “Five minutes of sweeping every week saves hours of scrubbing later.”
Budgeting & Time Estimate
Understanding the investment required for installing flagstone pathway systems helps avoid those mid-project “oh no” moments when the credit card comes out again. For the DIY approach, budget approximately $8-12 per square foot for materials, depending on your stone choice and local availability. If you prefer to have professionals like our team at M.T. Mayo Corp. handle the installation, expect to invest between $15-27 per square foot for a complete, worry-free installation.
For perspective, let’s break down the costs for a typical pathway that’s 3 feet wide and 20 feet long (60 square feet):
| Item | Approximate Cost |
|---|---|
| Flagstone (including 10% extra) | $400-600 |
| Crushed stone base | $75-100 |
| Sand or decomposed granite | $50-75 |
| Landscape fabric | $20-30 |
| Edging materials | $60-100 |
| Joint filling material | $30-60 |
| Tool rentals (compactor, etc.) | $75-150 |
| Total DIY Cost | $710-1,115 |
| Professional Installation | $900-1,620 |
Time-wise, most homeowners can complete a pathway of this size in a weekend or two (2-5 days total), depending on your experience level and how cooperative the weather decides to be. Our professional crews typically complete the same project in 1-2 days, thanks to specialized equipment and years of experience.
One tip we always share: buy about 10% more flagstone than your calculations suggest you’ll need. There’s nothing more frustrating than being a few stones short at the finish line, especially when you’re trying to match stone from a different batch. That extra material accounts for cutting waste, breakage, and those oddly shaped areas where regular stones just won’t fit.
Permit & Code Checklist
Before you dig that first shovelful, take a moment to understand the rules of the game. Local regulations can vary significantly between towns in Middlesex and Essex Counties, and a little homework upfront prevents headaches later.
Your very first call should be to Dig Safe at 811 – at least 72 hours before you plan to break ground. This free service marks underground utilities and is required by Massachusetts law before any digging, no matter how shallow. As one of our project managers puts it, “The only thing worse than hitting a gas line is explaining to your neighbors why they don’t have internet for a week.”
Many communities have specific slope requirements for walkways. Typically, you’ll need to maintain a cross slope (side-to-side) of no more than 2% and a running slope (in the direction of travel) of no more than 5% to keep your pathway accessible to everyone. These seemingly small details make a big difference in usability and safety.
Good news for environmentally conscious homeowners: flagstone pathways with permeable joints (using sand, gravel, or plants between stones) often qualify as partially permeable surfaces in towns with strict runoff regulations. This makes them more favorable than solid concrete in areas concerned about stormwater management.
If you live in an HOA-governed community, review their guidelines before selecting your materials. Some associations have specific requirements about hardscape colors, materials, and designs – and finding this after you’ve purchased your materials can be a costly lesson.
Waterfront property owners or those near wetlands face additional considerations. Massachusetts takes wetland protection seriously, so check with your local Conservation Commission if your property falls within a buffer zone – they’ll guide you through any additional permits needed.
FAQs About Installing Flagstone Pathway
What is the recommended width for a flagstone pathway?
A 3-foot width hits the sweet spot for most residential pathways – comfortable for one person walking while allowing enough room to steer with garden tools or a wheelbarrow. For main entrances where people might walk side by side, consider going wider to about 4 feet. Garden paths where you’re just strolling and enjoying the flowers can be narrower at 18-24 inches, creating a more intimate experience.
How thick should flagstones be for a pathway?
For pathways that will handle regular foot traffic, choose flagstones between 1.5-2 inches thick. This might seem overly sturdy, but thinner stones are a false economy – they’ll crack under pressure and need replacement much sooner. If your pathway might occasionally see vehicle traffic (like near a driveway crossing), opt for even thicker stones of at least 2-2.5 inches to prevent cracking under the added weight.
Can flagstones be installed directly on soil?
While you technically could lay flagstones directly on soil, we strongly advise against it for any pathway that will see regular use. Without proper base layers, stones will shift, sink, and create an uneven surface faster than you can say “trip hazard.” The only exception might be occasional stepping stones in garden beds, but even these benefit from at least a sand setting bed to keep them stable and level.
How long will a flagstone pathway last?
With proper installation and minimal maintenance, expect your flagstone pathway to grace your landscape for 50+ years. We’ve worked on properties in Concord and Lexington with flagstone walkways that have weathered 75 New England winters and still look magnificent. The secret to this impressive longevity isn’t magic – it’s simply proper installation with adequate base materials and basic ongoing care.
Is installing a flagstone pathway a DIY-friendly project?
Absolutely! Installing flagstone pathway systems is well within reach for motivated homeowners with basic landscaping experience. The process requires some sweat equity and attention to detail, but doesn’t demand specialized skills or tools beyond what you can rent locally. That said, for larger pathways or complex designs integrating steps or retaining walls, professional installation might save you time and frustration. At M.T. Mayo Corp., we’re always happy to provide guidance or handle projects of any size throughout our service area.
How do I prevent weeds from growing between flagstones?
The best defense is a good offense: start with quality landscape fabric under your base layers, use polymeric sand or tightly packed decomposed granite in the joints, and consider applying a pre-emergent herbicide in early spring. For those preferring organic methods, regular sweeping and prompt removal of any weeds before they establish themselves will keep your pathway looking pristine without harsh chemicals.
Conclusion
A flagstone pathway represents one of the most rewarding outdoor projects you can undertake for your home. The natural beauty of these stone pathways brings an organic, timeless quality that manufactured materials simply can’t replicate. There’s something almost magical about how flagstone seems to belong in the landscape, as if it emerged naturally from the earth rather than being placed by human hands.
Installing flagstone pathway systems might require some sweat equity, but the results are truly worth it. The varied colors, unique textures, and irregular shapes of flagstone create a warmth and character that transforms an ordinary walkway into a landscape feature. When properly installed using the methods we’ve shared, these pathways become more than just a way to get from point A to point B—they become an integral part of your outdoor living space.
Throughout this guide, we’ve walked you through the entire process—from careful planning and proper base preparation to thoughtful stone selection and meticulous installation. While it might seem like a lot to absorb, each step builds on the previous one, creating a pathway that will stand the test of time. Yes, the work is physically demanding and requires attention to detail, but as many of our clients have finded, the satisfaction of creating something beautiful and lasting is immeasurable.
For homeowners in Middlesex and Essex Counties considering this project, we encourage you to assess your comfort level with DIY landscaping. Many of our clients have successfully installed smaller flagstone paths themselves, learning valuable skills they’ve applied to future projects. There’s a unique pride that comes from looking at your completed pathway and knowing you built it with your own hands.
That said, we completely understand that not everyone has the time, physical ability, or desire to tackle such a project. For more complex installations or those that integrate with other landscape features like steps, patios, or retaining walls, professional installation often makes sense. At M.T. Mayo Corp., our experienced teams have created countless flagstone pathways throughout communities like Cambridge, Woburn, Lexington, and Winchester. We’re always happy to provide a consultation and share our expertise.
A client in Bedford recently told us, “I walk on my flagstone path every morning with my coffee, and it still brings me joy three years later. The way it curves through the garden feels so natural—like it’s always been there.” This sentiment captures exactly why flagstone pathways remain so popular despite newer, less expensive alternatives.
Whether you choose the DIY approach or decide to bring in professionals, your flagstone pathway represents an investment that improves both the beauty and value of your property. Unlike many home improvements that become dated or wear out, a properly installed stone pathway actually improves with age as it settles into the landscape and develops a natural patina.
We hope this guide has given you the knowledge and confidence to create a flagstone pathway that will bring you joy for decades to come. For more information about professional installation services, please visit our page on More info about Walkway Installations.
Remember—the best pathways don’t just connect physical spaces; they create experiences and memories with every step you take. Happy building!
